Monday, January 28, 2013

Celebrating African American Inventors (free printable)

The month of February is Black History Month where we celebrate the contributions and successes of African-Americans.  This year I thought of a great way to celebrate both black history month while using ASCA's career domain by creating a bulletin board of African-American inventors.

-I created this using Word by typing the invention, inventor and included clip art of the invention (I used Google images for the pictures) .  

-I also created a bulletin board title using Word.  After printing the title, I cut, added construction paper backing for color and laminated.
Title words
What a difference some construction paper can do!

-I printed, added construction paper backing (with a glue stick) and laminated each inventor and posted.  I found some cool border at a teacher speciality store ($2.99).  While at the teacher store, I also found a set of positive quotes from African-Americans ($6.99) to post around the school.

Inventions with construction paper

Border

Positive Quotes

Here's the finished product:

Finished product!

I LOVE this and found out that so many current things we use were invented by African-Americans, which ties into how regardless of who you are and what kind of struggle you may have, anyone can be an inventor or anything that they choose to be.

I want to share this with you so that your school can celebrate these accomplishments during black history or any month.  Click here to download the title letters and click here to download the inventors.  


Enjoy!  

Pin It

Monday, January 21, 2013

(Paperless) tracking of students seen


Each year I have full intentions of keeping great notes on the students I've seen each day.  I even made a special form to include in my counselor notebook to keep track of notes, parent calls, to-do lists, etc.  Well I started out strong with keeping daily notes for a couple of weeks and it went downhill (at a record speed).  So I thought to myself, "there's got to be a better way for me to keep up with who I've seen that doesn't require me to keep up with a bunch of paper". So I thought and thought....Hmmm what do I usually have with me that I can keep student notes on...you guessed right my iPad!

So I decided to create something a little similar to my previous post on Min Mtgs with a tech spin and made use of the fantastic features of Google Docs.  Here's what I did:

-I created a survey in Google Docs with the following questions:
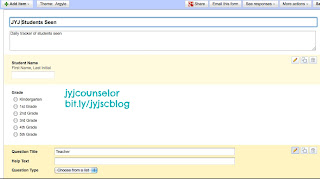
Student Name- First Name, Last Initial (text question)
Grade-K-5 (multiple choice question)
Teacher- I listed all the teachers by grade level (drop down list)
Reason for visit- Just visiting, Friendship/Peer Issues, Sadness, Anxiety, Lunch, Group, Anger, Other (multiple choice question)
Notes-  Where I type in quick notes, if I need to follow up, call a parent, etc (paragraph text)

Setting up survey questions using Google Docs

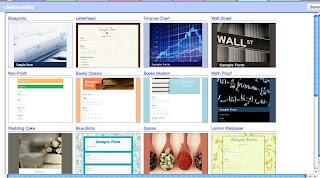
-After all my questions were typed, I added a theme to my survey for a personal touch (currently there are 97 different themes to choose from).

Samples of themes
Here's my finished survey:


-I emailed the link (from Google) to myself and of course added it to my home screen of my iPad so it's easier for me to locate.

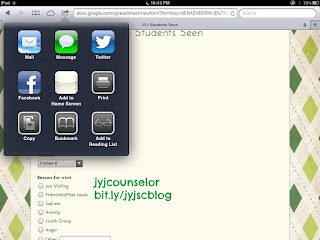
Click to add to home screen.  If your browser doesn't look like this on your iPad, you will need to update your iPad software (go to settings, general, software update).

-As I input my notes, everything uploads into a spreadsheet.  I can easily see who I've seen.  I have the link private to only me, meaning that I'm the only one that can view the information, so it's safe just in case you're wondering.  Being in spreadsheet view allows me to easily sort and filter data (this is an awesome feature!)

Using this format to take notes has improved my note taking dramatically and most importantly it's completely paperless (I don't care to keep up with lots of paper, especially when there are other paperless alternatives).  I liked this format so much, that I plan to create a 2nd (paperless) survey for parent communication.

I will admit that I am still keeping daily paper notes on parent calls, to do list and just general notes for myself (hey, I can't let my counselor created notebook go to waste just yet).  I'm brainstorming a way to ease this into paperless too.  Stay tuned, I'll be sure to share!

Does anyone have any other suggestions on how to keep (paperless) daily student notes?  I'd love to hear them.


Pin It

Friday, January 18, 2013

Career & College Ready Display


I got this idea after seeing a banner from the school counselor blog store.  I created a similar banner from Vistaprint (99 cents on a black Friday sale).  I then made printouts of each college/university in NC (my state) using Word.

For the printouts, I typed each school name (in various fonts and colors) and put an image of the school logo or mascot below the name (use Google images).  I then cut and laminated all of the schools.  I also did something similar with the top 25 best jobs, which I saw under the #schoolcounselor hashtag on Twitter (by the way school counselor is #17).  I added a few more careers that came up often from my minute mtgs with my students (I sorted my spreadsheet of data by career to get more career choices).  I put the colleges and careers all around the banner (in no particular order).

Banner from Vistaprint

Colleges (sorry for the glare from the camera)
Careers (laminated)
Here's the finished product:


I like this display, pretty simple and easy to make but such a meaningful message!

How do you display career and college ready info at your school? Pin It

Monday, January 14, 2013

(Pt. II) Planning a School-Wide Character Ed Event at Your School


In my previous post on planning a school-wide service (character ed) night at your school.  I discussed pre-planning (this is the importance of having a committee).  In this post I'll focus on how to plan and execute the event at your school.

-Remind students, staff and parents about the event.  This year we had a banner put up in front of the school and a yard signs at carpool and the front entrance to remind them of the event.  I had these made from Vistaprint (I added the date by creating a Word document, printed and added to the sign, which can be updated yearly).

Banner made using VistaPrint
Yard sign at the front of the school

-Once you've determined what organizations you plan to help and which items to collect for the service projects; determine what and how you will collect your items.  This year we started off with collecting items school wide (before the holidays).  These items included (old t-shirts, cardboard tubes, canned fruits, vegetables, healthy snacks and gently used winter items such as coats, gloves, scarfs & hats).  After the holidays we assigned items for each grade level to bring in (that way items donated are pretty equally distributed).


Sample of the signs on the collection bins (I used PowerPoint to create this)
Donation bins at the front entrance of the school
-If you are collecting school wide, there's NO such thing as over publicity.  We send home a note with a list of the requested donated items to all students, have the principal include it in her weekly phone message and include it on the televised school news.  For the news show, I made visuals (using PowerPoint) of the needed items.  We have collection bins throughout the school (which we mention in our note, phone message and news message, remember there's NO such thing as over publicity).  Another option that the parents seemed to like was being able to make monetary donations instead of sending their child on the bus with canned items, snacks, heavy items, etc.  By giving a monetary donation, our committee can go to the store and purchase items that we're running low on.  As I've said before, we are very fortunate to have so many parents willing to go above and beyond with donations and volunteering for our event.

Collection bins
Winter items collected
Bin to collect cardboard tubes...we had more than enough!  This is a range applicance box donated by a parent.  I covered the box with butcher paper and posted donation signs on it.  We had 4 (large) collection boxes.
Bin to collect winter items.
Visual used for the JYJ News Program.

- Decide/plan  where each service project station will be held in your school.  For an example, we kept all the projects that dealt with food packing in the cafeteria, crafty type projects in the art room, etc.

All food stations were in the cafeteria (this was the finished backpack buddies program station).
-Recruit, recruit & recruit volunteers!  I created a Google Doc that was sent to the parent yahoo email group and we were able to fill all volunteer spots to manage service project stations.  We also contacted the neighboring high school for students who were looking for community service hours (all students are required to complete service hours).  Last year we had 10-15 high school volunteers who were able to move, set up/take down tables and station materials.

Volunteer sign up, using Google docs
-At each station, we made specific directions on what needed to be done and we made a sample of the finished station product (I recruited students to make the samples before the event) so that the station managers could show the students the finished product.  We had 2-3 parents (and in some cases a parents and a student) manage stations.

A few of the station directions
-Invite a representative from the organization you're helping to come to the event.  Most of the people will come and say a few words during our (quick) opening session and tell how our community involvement makes a difference and what their organization does to help the community.  The great thing about having a representative there is that they can also take back the items that were made/packed at the station and you won't have find someone to take them to the organization.

-We actually serve dinner during our event also (this is up to you).  We have pizza, snack carrots, cookies, water and lemonade.  Again, this is funded through our PTA and we accept donations for the cost of the food.  Parent volunteers handle this part of the event.

-To assign stations, when students come in to the event, they choose  2 tickets from a basket which tell them which stations to go to.  I made these "tickets" using Avery business cards and typed the station names and locations on the cards.  Having students pick, eliminates overcrowding at some stations.

-Our JYJ Gives back event is just a couple of weeks away and I'll be sure to share how our event went this year.  Stay tuned!


Pin It

Friday, January 11, 2013

Whoo hoo, I'm the website of the month!


What better way to start off 2013 than being featured as the January website of the month for Elementary School Counseling!  I was so excited when Marissa Rex contacted me to share the great news (which you can tell in my interview, I was talking soooo fast based from pure excitement, shock & nervousness).  I've been following her blog & reading her website for quite some time.  In fact she's my December 2012 JYJ Shout Out!   I am so glad that I can share what happens in my little counseling world through this blog while being able to connect with so many fantastic school counselors.  Thank you so much for reading!  Thanks so much Marissa, I'm truly flattered beyond words. Pin It

Monday, January 7, 2013

Ice-Breaker with a Tech Spin


This year, I've made it my personal counselor project to update my ice-breaker activities with my students.  Yes I have the beach ball with the questions on it (brilliant idea) and I made the popsicle sticks with questions on them earlier so now I needed a jyj counselor tech-like ice-breaker activity.  So I had this great idea to use QR (Quick Response) Codes for my next ice-breaker activity.  QR codes, when scanned can take you directly to web pages, videos, pictures or documents without having to type in a web address. These cool codes are popping up everywhere... on TV, newspapers, magazines and even on various products.   So I thought of a way to incorporate QR codes into my ice-breaker.

Here's how I used QR Codes for my ice-breaker:

-I typed ice-breaker questions into Google Docs (use the presentation feature, it's just like PowerPoint).
If you need ice-breaker question ideas, click here.  
Ice-breaker question
-After I typed the question, I clicked the "share" button on my Google Doc, clicked available to "anyone with the link" and copied and pasted the link to share.  You will have to type each ice-breaker question into it's own separate file (so that it can have it's own link from Google Docs).


-I then went to the site Kaywa QR creator to make a code from the link (just copy & paste the Google link).  After you paste the link, click "generate free" and your new qr code will appear.


-I copied and pasted the QR code into a Word document.  (I used the Avery business card paper template).

Business cards I used, $6  from Sams Club. 
-I printed QR codes on business cards & laminated.

QR Codes printed on business cards

-I put the cards in a jar where the students can choose randomly which questions they scan to answer next.  I use Qrafter (free QR scanner app) to scan the cards.

Cards in a jar

This ice-breaker was a complete hit with my students (can be used on either individual or group counseling).  They LOVED it!  They liked that they didn't know what the question would be until they scanned it on the iPad.

Do you have any tech ice-breaker ideas?  I'd love to hear them!


Pin It

Friday, January 4, 2013

Lesson on Listening & Following Directions


How can I reiterate to  my 1st grade friends the importance of listening and following directions?  With a fun listening and following directions lesson of course! 


-I opened by asking the students questions about listening/following directions: Who do you listen to?  Teachers, friends, family, etc.  Ask students why do we listen?  What could happen if we don't listen when someone is giving directions?  (Be prepared for a variety of responses).

Why follow directions?

-I made a "direction scramble" activity using the Promethan board where students had to rearrange directions to a task in the correct order (shows how to give and follow directions).  I had several direction scenarios for students to put in order.

Screenshot of direction scramble.

-After the direction scramble game, I showed them the animated book Howard B. Wigglebottoms Learns to Listen.


-After the video we discussed what happened to Howard when he didn't listen and when he listened.  Discuss what happened to Howard when he did listen (there's an interactive quiz on the website that I also used with the students).

-I then told the class that they get to practice listening and following directions in a fun and exciting way!

-I told everyone to stand up, move to the open space in the classroom and make sure they have enough space to move.  I played the line dance song the Cha-Cha Slide, which gives directions to follow (the students LOVE dancing, even if they can't keep the rhythm, it's so fun!)  I used a Youtube version that has the words (directions) so the class can see and follow along.    I like to do the dances with them, that also shows that the counselor listens and follows directions too!

Cha Cha slide time!


What lessons do you use for listening and following directions? Pin It